Tuesday, April 11, 2017

Chicken Sausage Pasta for Weight Loss

This has become my favorite go-to meal while trying to lose some weight. There are many varieties of chicken sausage; the ones pictured just happened to be the two I had when I decided to blog this. 


Ingredients for a single serving: 
1 chicken sausage
1 cup spinach, loosely chopped
3/4 cup spaghetti sauce 
Whole wheat pasta of your choice 

For the week, I boil a pound of spaghetti noodles and keep the extras in the refrigerator. 
Each night I cut one of the fully-cooked chicken sausages into pieces. (I cut the casing off of the al fresco brand because it is too tough for me.) 
Add the sausage to a frying pan. Brown the sausage for about a minute. Add the spinach and let it cook down (takes about 30 seconds). Add the spaghetti sauce to the sausage and stir. 

Add your desired amount of pasta to the frying pan and stir until warmed through.  


This meal is ready in under 5 minutes if you have your pasta boiled ahead of time. If not, it is still done in under 15 minutes. 

To change things up, I added pesto instead of spaghetti sauce some nights. 


Play Dough Eggs

We love to make our own play dough so we decided to make some tonight to share with Rachel's friends at preschool. To add an Easter touch, we put the play dough in plastic eggs.


Here is the recipe I use for play dough: 

I started by making microwave play dough. Put 2 cups of flour, 2 Tablespoons of oil, 1 cup of salt, 2 cups of water, and 1 Tablespoon of cream of tartar. Mix that in a microwavable bowl with a whisk.


Next, add the food coloring. (It takes about 50 drops of yellow and 15 drops of red to make this orange if you use regular food coloring. I had some orange food gel that I used.)

Next, place it in the microwave for 1 minute. Pull it out and stir with a spoon. Place back in for another minute. Continue this until the mixture becomes a dough. It took mine 4 minutes. Let it cool for a couple of minutes. When you pull the dough from the bowl, it becomes very soft and pliable. Knead it until it is soft. 


Wednesday, April 5, 2017

Carrot Patch Brownies


Make a pan of brownies as directed on the package. 

Let the brownies cool. I then spread some salted caramel frosting on top of half of the brownies. (Some of the kids don't like that kind of frosting, so I left half of it plain.) 

Then I crushed up a row of Oreos and placed that on top of the brownies. 

I melted some white chocolate disks, added 1 tsp coconut oil, and some orange food coloring. Then I dipped strawberries into the chocolate and set them on a piece of parchment paper to harden. 

I placed the chocolate-covered strawberries on top of the brownies and decorated with some candy peanut butter eggs. 


St. Patrick's Day Scavenger Hunt Clues

Every year the kids look forward to our holiday scavenger hunts. The St. Patrick's Day hunt was a success! 

Clue #1: March 17, The Day we wear Green. 
This hunt begins where laundry is cleaned.

Clue #2: Laundry gets folded, and put into piles. 
The St. Patrick's Tree will bring you some smiles. 

Clue #3: This tree is so awesome. I just can't explain.
Lifting weights may put you in pain!

Clue #4: This room get so messy. Just like Rachel's does. 
But check out her top drawer. Why? Just because. 

Clue #5: Your hunt's almost over. The pot's almost found.
The end of the rainbow, Go check your pounds! 


Strawberry Shortcake

This recipe was featured in the newest Taste of Home magazine. We tried it this week. It is definitely a recipe I will make again. 

Ingredients: 
3 cups strawberries, sliced
1/4 cup sugar
1/2 tsp vanilla

Shortcake:
1 1/2 cups flour
2 1/2 Tbs sugar, divided
1 1/2 tsp baking powder
1/2 tsp baking soda
1/4 tsp salt
6 Tbsp cold butter, cubed
1/2 cup buttermilk (I added 1/2 tbsp vinegar to 1/2 cup milk)
1 Tbsp heavy cream

Topping: 
3/4 cup heavy cream
1 Tbsp sugar
1/4 tsp vanilla 
(The kids preferred reddi-whip, so I will probably just use that as topping instead)

Start by combining the strawberries, sugar, and vanilla. Mash slightly and set aside.

Preheat the oven to 400 degrees. Whisk the flour, 2 Tbsp sugar, baking powder, baking soda, and salt together. Cut in butter until it is crumbly. Add the buttermilk Stir until just combined. Drop about 1/3 cup of the batter on a baking sheet. (I used my baking stone and made 5 shortcakes with this amount of dough.) Brush the tops with the heavy cream and sprinkle with remaining sugar. Bake for about 18 minutes. 


If you want to make your own topping, beat the 3/4 cup heavy cream until it begins to thicken. Add the sugar and vanilla and continue to beat until peaks form. 

Cut the shortcakes in half and fill with strawberries and whipped cream and place more strawberries and whipped cream on top. 


Wonton Soup

I found this recipe in the All Recipes magazine. I have never really tried wonton soup because I was always afraid of what was in the middle of the wontons. This recipe was delicious. It would make about 8 bowls of soup.  

Ingredients: 
12 cloves garlic
1/2 cup vegetable oil
1 pound ground pork
1 1/2 tsp chopped cilantro stems
1/2 tsp sugar
1/4 tsp salt
pepper 
2 tsp plus 3 Tbsp fish sauce (I didn't have fish sauce so I used oyster sauce) 
6 cups chicken broth
2 Tbsp cornstarch
1 package wonton wrappers
1 1/2 cups spinach
chopped green onions for garnish

Start by thinly slicing 8 cloves of garlic and placing that and the oil in a small frying pan. Bring to a simmer and cook for about 5 minutes or until it browns. Set fried garlic aside. 

Chop the remaining 4 cloves of garlic and mix with ground pork, cilantro stems, sugar, salt, pepper, and 2 tsp oyster sauce. 

Sprinkle a baking sheet with some cornstarch. (For use later, place the chicken broth in a saucepan and bring it to a simmer. You should also bring a separate large pot of water to boil while you are filling wontons.) 

 I put down 9-10 wonton wrappers and placed a tsp of filling on each wrapper. Wet the edges of the wrapper and close. 


Place the wontons on the cornstarch covered baking pan. Lightly cover with plastic wrap while you fill the rest of the wonton wrappers. 


Place the wontons in a large pot of boiling water.  Gently stir the wontons and bring the water back to a boil. Add 1 cup of cold water to the pot and then bring it back to a boil. Add 1 more cup of cold water to the pot and bring back to a boil again. This process ensures the meat is cooked, but the wontons aren't overcooked. 


Remove one wonton and cut open to make sure the meat is fully cooked. The pork should no longer be pink. If it is done, divide the wontons into serving bowls. 


Stir the spinach into the simmering chicken broth. Season the broth with the remaining oyster or fish sauce. Ladle the broth over the wontons and spoon the fried garlic on top of the soup. Garnish with green onions and extra cilantro if desired. 


Home Makerspace

After attending a conference on Makerspaces and teaching a STEM class this year, I really see the importance of getting my kids active with different types of projects that really showcase their problem solving skills and creativity. 

We have a little corner in our living room that I turned into a Makerspace. (It isn't a large area, so it is a little crowded and cluttered, but it really serves it purpose.) 


I found these I can build cards on Teachers Pay Teachers. They work really well to build inspiration. We are having a great time with the space so far. (Rachel's favorite go-to object is toilet paper rolls. David's first project was pot of gold he made out of pipe cleaners.) 


Here is one of the latest creations from the makerspace. 


Pi Day Fun

We love to do something special each year for Pi Day. We always find some circle crafts to do at home and just casually introduce the younger kids to the concept of Pi. 

This year, I created some Pi Day cards to give to my students and made some Pi cheese bread and pizza. 

I always stand outside my door when kids are walking by in the morning. Instead of just saying good morning, I greeted them with these cards. The kids got a kick out of it. I even saw some kids "re-gifting" the cards later in the day.
Homemade pizza and cheese bread is always a hit at our house. Here is the recipe for the dough: 
http://workingmomwonders.blogspot.com/2014/01/snowman-cheese-bread.html We have turned this cheese bread into many shapes throughout the years. 


I use the same dough for my pizza crust. 

Crispy Marshmallow Brownies

We all had a chocolate craving the other night, so I found this Duncan Hines recipe and gave it a try: http://www.nutmegnanny.com/2009/05/21/peanut-butter-marshmallow-krispie-topped-brownies/


Ingredients:
Brownie mix (plus water, oil, and eggs to make the brownies)
4 cups mini marshmallows
1 1/3 cups chocolate chips
1 cup peanut butter
3 Tbsp butter
2 cups Rice Krispies


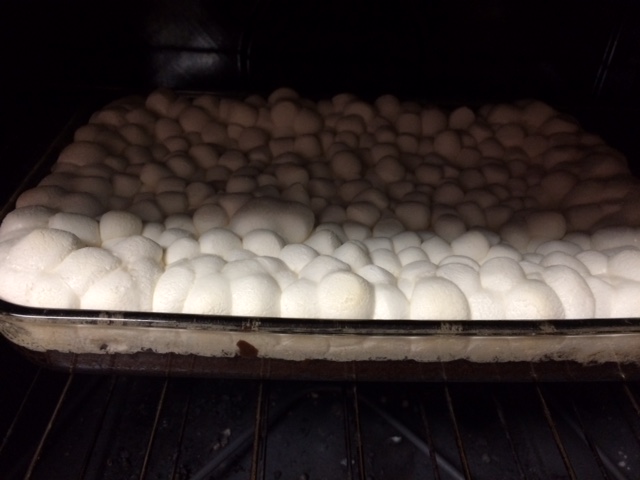
Start by making the brownies. Grease a 9x13 inch pan and bake the brownies 3 minutes under the recommended time. When there are 3 minutes remaining, add the marshmallows to the top. 

Continue to bake 2-3 minutes, or when the marshmallows start to brown slightly. Pull out the brownies and let them cool on a wire rack. 

Combine the chocolate chips, butter, and peanut butter in a microwavable bowl. Heat in the microwave for 30 seconds. Stir and repeat until it is melted. 
Add the Rice Krispies and stir. 


Because we were impatient, I didn't wait for the marshmallows to cool completely before adding the chocolate cereal mixture. 
We ate one while it was pretty gooey. 


They are much easier to eat after they cool completely and set a little bit. 


Thursday, March 16, 2017

Beauty and the Beast Paper Circuit


Our newest adventure has been paper circuits. For basic paper circuits, you only need some copper tape, led lights, and coin batteries. 

We started by folding a piece of cardstock. On the outside cover we traced a rose and colored it. We then decided where we wanted the light to be placed. 

On the inside cover, I folded one corner of the paper over to create a flap. Then I ran two pieces of copper tape down the piece of paper. One side of the tap was on the flap and the other was placed under the coin battery. 


The tape has to run down the page so one end of the light is on one side of the tape and the other end of the light is on the other piece of the tape. (The tape on the far left of my paper does not have to be there.) The right side of the paper is the led light pushed through. For more information about negative and positive ends in a simple circuit, see this pdf: http://cdn.makezine.com/uploads/2014/07/papercircuits.pdf

The flap must be flipped down so the tape hits the battery and closes the circuit. 


When the led light wires hit the tape and the circuit is closed, the light will shine. 


Sunday, March 12, 2017

Carrot Cheesecake Cake with Cream Cheese Frosting

This recipe has been circulating around Facebook and looked delicious, so I made it for my sister's birthday today. We will be making it again! (Here is the original recipe: http://www.shugarysweets.com/2016/03/carrot-cake-cheesecake-cake)
I didn't use the nuts that the original recipe calls for. 

Ingredients:
Cheesecake layer
2 8oz packages of cream cheese, softened
1 cup sugar
1/4 tsp kosher salt
2 eggs
1/4 cup sour cream
1/3 cup heavy whipping cream

Cake layer
2 cups sugar
1 cup canola oil
4 eggs
2 cups flour
1 tsp baking soda
1 tsp baking powder
1/4 tsp kosher salt
2 tsp cinnamon
2 cups shredded carrots

Frosting
1 cup butter, softened
1 8oz cream cheese, softened
1 Tbsp vanilla
1/4 cup heavy whipping cream
4 cups powdered sugar


Start by making the cheesecake layer. Preheat the oven to 325 degrees. Fill a large roasting pan with an inch of water. Place the roasting pan in the oven so the water preheats as well. 

Beat the 2 packages of cream cheese and 1 cup of sugar with your mixer. Add the 1/4 tsp salt and 2 eggs. Beat well. Add the 1/3 cup whipping cream and 1/4 cup sour cream and whip for a couple of minutes. 


Prepare a 9 inch springform pan by wrapping the bottom and sides with a double layer of tin foil. (It was very important to put two layers of tin foil on the bottom of the pan so the water doesn't leak into the cheesecake. Place a piece of parchment paper on the bottom of the pan. 


Put the cheesecake mixture in the pan. Place the pan in the middle of the water bath that is already heated in the oven. Bake the cheesecake for 45 minutes. Turn the oven off and let the cheesecake sit in the oven for another 30 minutes. Let it completely cool on the counter. When it is cool, take the outer edge of the pan off of the cheesecake and place the cheesecake in the refrigerator for a couple of hours. 


Meanwhile, make the cake. Preheat the oven to 350 degrees. Grease and flour two 9 inch round cake pans. 
Beat the 2 cups sugar, 1 cup oil and 4 eggs in a mixing bowl. Add 2 cups flour, 1 tsp baking soda, 1 tsp baking powder, 1/4 tsp kosher salt, and 2 tsp cinnamon
Fold in 2 cups shredded carrots


Pour into the pans and bake for 30 minutes. Cool on a wire rack for about 10 minutes and then remove the cake from the pan. 

Place the cheesecake layer between the carrot cakes. 


To make the frosting, whip the 1 package of cream cheese and 1 cup butter. Add 1 tbsp vanilla and 1/4 cup whipping cream. Add 4 cups of powdered sugar, beating well after each cup. 
Spread the frosting on the cake. 


Beauty and the Beast Stained Glass Project

One of the third grade teachers at our school showed me this stained glass project. We thought it looked really cool, so we gave it a try. 

We printed Beauty and the Beast coloring pages and taped it to the table. Then we taped a piece of Saran wrap over the picture. (Make sure you tape it tight to the table.) 

We used a black Sharpie to outline the picture. Then we colored in the rest of the picture. 


The third graders taped their saran wrap to a piece of tin foil. We just taped ours right to the window.