Sunday, September 29, 2019

Pumpkin Streusel Muffins

Ingredients: 
1 3/4 cups flour
1 tsp baking soda
2 tsp cinnamon
1 tsp pumpkin pie spice
1/2 tsp salt
1/2 cup canola oil
1/2 cup sugar
1/2 cup brown sugar
1 can pumpkin (1 1/2 cups)
2 eggs
1/2 cup milk

Streusel:
3/4 cup flour
1/4 cup sugar
1/4 cup brown sugar
1 tsp pumpkin pie spice
6 Tbps melted butter

Glaze:
3/4 cup powdered sugar
1 Tbsp maple syrup
1 Tbsp milk

In a large mixing bowl, whisk the flour, baking soda, cinnamon, pumpkin pie spice, and salt together. In a small bowl, whisk the oil, sugar, brown sugar, pumpkin, eggs, and milk together. Add the wet ingredients to the dry ingredients. 
Fold until just combined. 

Fill a paper liner about 2/3 of the way with the mixture. (This made 19 muffins for me) Using a fork, combine the flour, sugar, brown sugar, and pumpkin pie spice with the melted butter. 

Top each muffin with crumb mixture, pressing the crumb mixture down a little with your hand. Bake at 425 degrees for 5 minutes. Then reduce the oven temperature to 350 (keeping the muffins in the oven the whole time). Bake for an additional 15 minutes. 

Remove to a wire rack. 

Mix the powdered sugar, maple syrup, and milk in a bowl. 

Drizzle over the muffins. 


Pumpkin Streusel Coffee Cake

Ingredients: 
Cake:
1/2 cup sugar
6 Tbsp butter, softened
3/4 cup can pumpkin
2 Tbsp milk
2 Tbsp nonfat Greek yogurt
1 egg
1 tsp vanilla
1 1/4 tsp baking powder
1 cup flour
1 1/2 tsp cinnamon
3/4 tsp nutmeg
1/2 tsp ginger
1/4 tsp cloves

Streusel:
1/2 cup flour
1/2 cup brown sugar
3/4 tsp cinnamon
pinch of nutmeg, clove, and ginger
4 Tbsp melted butter

Glaze: 
3/4 cup powdered sugar
2 tsp maple syrup
1 1/2 Tbsp milk

Beat the sugar and butter until combined. Add the pumpkin, milk, and yogurt and mix well. Add the egg and vanilla. In a separate bowl, combine the flour, baking powder, and spices. Add the dry ingredients to the cake batter. Mix until smooth. 

For the streusel: In a separate bowl, combine the flour, brown sugar, cinnamon, and other spices with the melted butter. Use a fork to crumble the streusel. 
Place a piece of parchment paper on the bottom of a 9 inch cake pan. Grease the sides of the pan. Add half of the cake batter to the pan. 

Put half of the streusel mixture on top of the batter. Top that with the remaining cake batter. Then finish with the rest of the streusel. 

Bake for 25 minutes at 350 degrees. After cooling for a couple of minutes, transfer to a cooling rack. 

Mix the powdered sugar, maple syrup, and milk in a bowl. Drizzle the glaze over the cake. 

Note: I put the leftovers in the refrigerator, which gave it a new, delicious texture. So, this recipe is great warm or cold. 


Monday, September 23, 2019

Snickerdoodle Apple Bars

While looking for a new fall recipe, I came across these bars. (https://whatmollymade.com/snickerdoodle-apple-pie-bars/#_a5y_p=6753611) They are a delicious combination of an apple cobbler and crisp. They are best with whipped cream or ice cream on top.

Ingredients: 
2 1/4 cup flour
1/2 tsp. baking soda
1 1/2 tsp cinnamon
1 tsp kosher salt
1 1/2 sticks butter, melted
1 cup sugar
1/2 cup brown sugar
2 eggs
1 tsp vanilla
extra cinnamon for sprinkling

Apple filling:
2-3 apples, peeled and thinly sliced
2 Tbsp flour
2 Tbsp sugar
1 tsp cinnamon

Spray a 9x9 inch pan with cooking spray. Preheat the oven to 350 degrees.
Whisk together the flour, baking soda, cinnamon, and salt in a medium size mixing bowl. In a separate bowl, cream the butter and sugars for about 3 minutes. Add the eggs and vanilla. Gradually add the flour mixture and mix on low until just combined.


Put about 2/3 of the dough into the bottom of the 9x9 pan. Sprinkle cinnamon on top. Bake for 15 minutes.

While the dough is baking, combine the apple slices, flour, sugar, and cinnamon in a bowl. When the bottom layer is done, pour the apple mixture on top and press down.

Break up the remaining dough into small spoonfuls and place on top of the apples. Sprinkle with more cinnamon.


Bake for 35-40 more minutes. Let cool a little before serving. 

Oil pastel painting

I have been experimenting with oil pastel crayons. I found a YouTube video that showed the steps for this creation, so I decided to give it a try. I was pleasantly surprised how easy this was. It only took about 15 minutes. 
Tape your paper to the table. Using pink, rose, violet, and black, color these blocks. 

Use a piece of tissue paper to blend the colors. To finish off the piece, I used sketching pencils to draw the telescope and the grass. I used the white pastel crayon to make the moon. I added drops of white glow in the dark paint for the stars. 

Another oil painting I created from a YouTube tutorial.

Leaf Projects

Rachel and I have been experimenting with leaf paintings. In the image below, she used watercolors to paint a leaf and then pressed it on paper to make an impression. 
Here we taped a leaf on black cardstock and used oil pastels to outline the leaf. Then we used our hand to spread the pastel colors outward. We pulled the leaf off the paper and were left with our creations. 


String Art

While trying to find some projects my 7th grade students could do, I came across these simple string art creations. I found these small panels of wood at Joann's. I got the smallest nails I could find at Ace Hardware and drew a mason jar on a piece of paper. Then I nailed the nails around the drawing. I pulled the paper off of the wood and tied a piece of string around a top nail. Then I placed the string around each nail and tied it when I got back to the start. On some of them, I varnished the wood and put dried flowers in the string. I added real flowers in others.  


Rectangle School Lunch Pizza

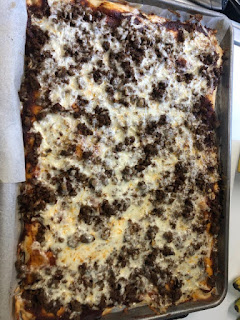
After finding a copy of an old recipe for school lunch pizza, I had to give it a try. (I remember eating a lot of this pizza in the school cafeteria!) The recipe did not disappoint. The crust was exactly how I remember it tasting. This had a little more meat on it than I remember school pizza having, but it turned out pretty well.


Ingredients: 
Sauce: 
6 oz tomato paste
1 cup water
1/3 cup olive oil
2 garlic cloves, minced
1 tsp salt
1 tsp pepper
1/2 Tbsp oregano
1/2 Tbsp basil
1/2 tsp rosemary
In a saucepan, mix all of the ingredients and simmer for about 20 minutes. I drained the oil off the top before putting it on the pizza, using a spoon and a paper towel.


Crust:
3 cups flour
3/4 cup powdered milk
2 Tbsp sugar
1 Tbsp yeast
1 tsp salt
1 2/3 cup warm water
2 Tbsp oil
Whisk the flour, powdered milk, sugar, yeast, and salt together in a large bowl. Heat the water up in the microwave and add the oil. Stir the wet ingredients into the dry ingredients with a wooden spoon. Let the dough sit for 5-10 minutes. 

Topping: 
1/2 pound ground hamburger
1/2 pound bulk sausage
salt and pepper
8 oz mozzarella cheese, shredded from the block
Brown the hamburger and sausage and drain the grease. Shred your own cheese and set both aside for later. 
Spray a sheet cake pan with cooking spray. Place parchment paper on top of that. Then spread the dough on top of the parchment paper. Using your fingers, spread the dough. Bake at 475 degrees for 8 minutes. 
Removed the cooked crust. Place the sauce, then the meat topping, and then the cheese on the crust. 


 Bake for another 8-10 minutes. Remove and let sit for about 5 minutes. Cut and serve. 


Monday, September 2, 2019

Pumpkin Earthquake Cake

I saw a video for this pumpkin cake and decided to give it a try. (https://thebestcakerecipes.com/pumpkin-spice-earthquake-cake/) It is absolutely delicious! 
Ingredients:
1 Spice Cake mix
3 eggs
1 can (15 oz) pumpkin puree
3/4 cup water
1/2 cup oil
1/3 cup sugar
2 tsp. pumpkin pie spice
Cheesecake mixture
1 8 oz cream cheese
1/2 cup butter (melted
3 cups powdered sugar
1/2 cup chocolate chips

Preheat the oven to 350 degrees. Spray a 9x13 inch pan with cooking spray. Mix the spice cake, eggs, pumpkin, water, oil, sugar, and pumpkin pie spice with a hand mixer until well combined. Pour in the 9x13 inch pan.

In a separate bowl, mix the cream cheese, butter, and powdered sugar until smooth. Drop spoonfuls on top of the cake batter mixture. Swirl the cream cheese mixture into the cake with a butter knife.

Add the chocolate chips on top. 
Bake for about 50 minutes. 
Cool and cut. Store in the refrigerator. 


Sunday, September 1, 2019

First Day of School Kindness Activity

A former student sent me a story of a teacher asking her students to write something nice about every student in their class. This student thought it was a great idea, wished she would have done something like this when she was in school, and thought if anyone would do it for students it would be me. So, I decided to turn the story into my first day of school assignment for my juniors.

The assignment: Write something nice about every student in your hour. I gave the students a class list. They created a Google Doc and wrote down a statement about every person on the list.  They also knew that the person receiving the messages would have no idea who wrote that message about them. In the end, each student would receive a list of about 30 things their classmates said about them. (I did this for all three sections of my junior English classes.)

I am a firm believer in never asking the students to do something that I haven't done myself, so I did the assignment as well to provide an example. I explained to the students that I am not "friends" with every teacher in our school, but I can say something nice about everyone. We had some great discussions about empathy and kindness and how powerful receiving a list like this could be for a person.

The process of getting all of the comments to an individual person took a great amount of time, but I learned so much through the process. 
1. I learned, when given the opportunity, teenagers can be very caring and really share extremely nice things about others. (We often think about them only sharing negative things when they hide "behind the screen".) And, even when their comments are anonymous to one another, they can really share uplifting things about everyone. (And if there was a comment that I thought might be taken the wrong way, I simply deleted it and moved on. No one will ever know what was deleted.) 
2. This process taught me a lot about my new students. I learned things that particular students really enjoy based on the comments from their peers. (Things I now can use as a conversation starter with them to build relationships.)
3. The kids really do notice each other. (Even if they don't hang out in the same social circle.) 
4. The students were very curious to see what their list said. They all want to have nice things said about them and to get some verification that they are doing something right. This assignment did that for every single kid. Trust me, I saw the lists! 

The process. I copied and pasted every single comment that was turned in to one document (What you see below. Each of the blacked out sections is a different student's name). Then I created a separate doc for every student (see the tabs at the top of the picture!). I went through and copied and pasted each comment to the individual student's doc. When I was finished (literally hours later), I shared each document with that individual student. Doing it this way was important to me because I didn't want any student to have any idea who said what. I also didn't want students to have to feel like they had to share their list with anyone in the class if I passed it back to them in a hard copy. They got an email late at night on the weekend and could read it on their own time.